ubuntu服务器 spring_struts配合
1、执行的顺序。
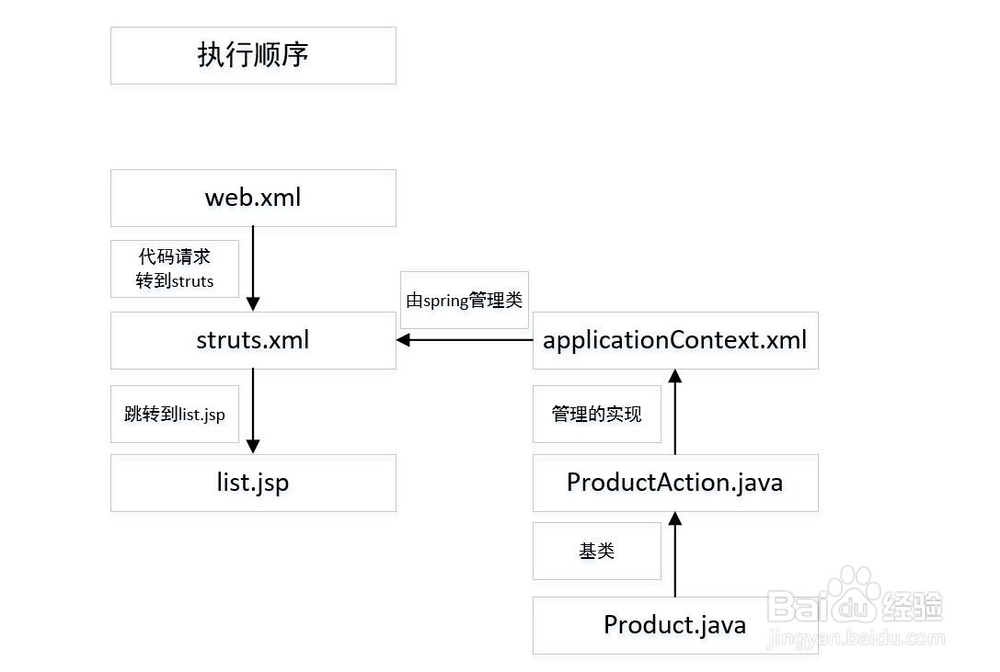
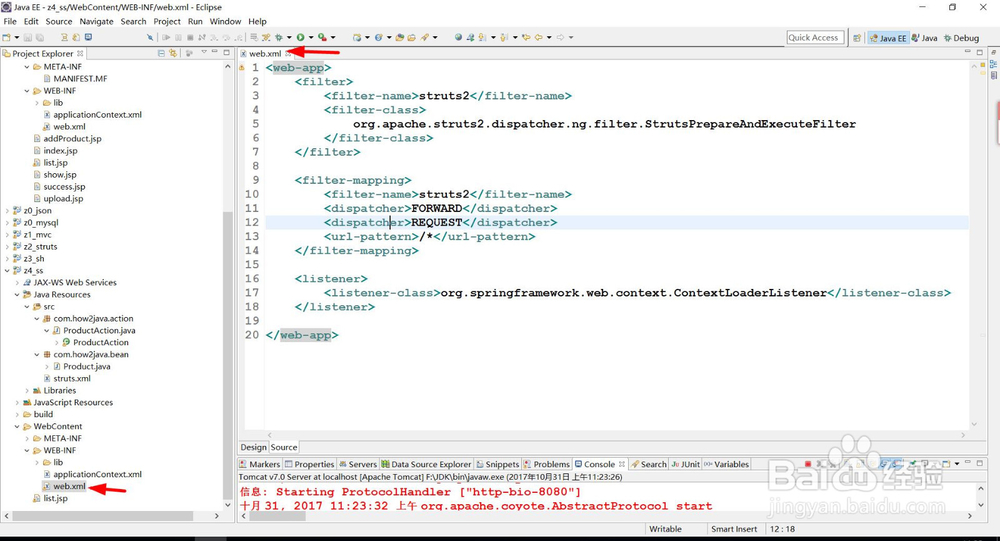
2、创建web.xml 文件。<web-app> <filter> <filter-name>struts2</filter-name> <filter-class> org.apache.struts2.dispatcher.ng.filter.StrutsPrepareAndExecuteFilter </filter-class> </filter> <filter-mapping> <filter-name>struts2</filter-name> <dispatcher>FORWARD</dispatcher> <dispatcher>REQUEST</dispatcher> <url-pattern>/*</url-pattern> </filter-mapping> <listener> <listener-class>org.springframework.web.context.ContextLoaderListener</listener-class> </listener> </web-app>
3、创建struts.xml 。指定类的管理由spring来执行。 <?xml ver衡痕贤伎sion="1.0" encoding="UTF-8"?><!DOCTYPE struts PUBLIC "-//Apache Software Foundation//DTD Struts Configuration 2.0//EN" "http://struts.apache.org/dtds/struts-2.0.dtd"><struts> <constant name="struts.i18n.encoding" value="UTF-8"></constant> <constant name="struts.objectFactory" value="spring"/> <package name="basicstruts" extends="struts-default"> <action name="showProduct" class="productActionBean" method="show"> <result name="show">show.jsp</result> </action> <action name="addProduct" class="productActionBean" method="add"> <result name="show">show.jsp</result> </action> <action name="listProduct" class="productActionBean" method="list"> <result name="list">list.jsp</result> </action> </package></struts>

4、创建applicationContext.xml.管理类。 <?xml version="1.0" encoding="UTF-8"?><beans xmlns="http://www.springframework.org/schema/beans" xmlns:xsi="http://www.w3.org/2001/XMLSchema-instance" xmlns:aop="http://www.springframework.org/schema/aop" xmlns:tx="http://www.springframework.org/schema/tx" xmlns:context="http://www.springframework.org/schema/context" xsi:schemaLocation=" http://www.springframework.org/schema/beans http://www.springframework.org/schema/beans/spring-beans-3.0.xsd http://www.springframework.org/schema/aop http://www.springframework.org/schema/aop/spring-aop-3.0.xsd http://www.springframework.org/schema/tx http://www.springframework.org/schema/tx/spring-tx-3.0.xsd http://www.springframework.org/schema/context http://www.springframework.org/schema/context/spring-context-3.0.xsd"> <bean name="productActionBean" class="com.how2java.action.ProductAction"> </bean></beans>

5、ProductAction.java对应xml的方法。 package com.how2java.action; import java.util.ArrayList;import java.util.List; import com.how2java.bean.Product; public class ProductAction { private Product product; private List<Product> products; public List<Product> getProducts() { return products; } public void setProducts(List<Product> products) { this.products = products; } public String show() { product = new Product(); product.setName("iphone7"); return "show"; } public String add() { return "show"; } public String list() { products=new ArrayList(); Product p1 = new Product(); p1.setId(1); p1.setName("product1"); Product p2 = new Product(); p2.setId(2); p2.setName("product2"); Product p3 = new Product(); p3.setId(3); p3.setName("product3"); products.add(p1); products.add(p2); products.add(p3); return "list"; } public Product getProduct() { return product; } public void setProduct(Product product) { this.product = product; }}

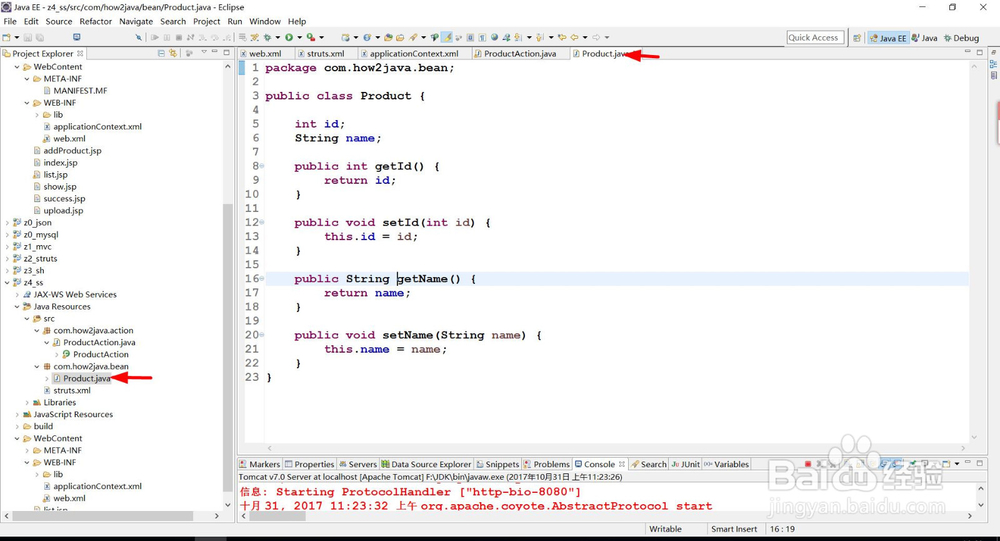
6、Product.java为基类。 package com.how2java.bean;public class Product { int id; String name; public int getId() { return id; } public void setId(int id) { this.id = id; } public String getName() { return name; } public void setName(String name) { this.name = name; }}
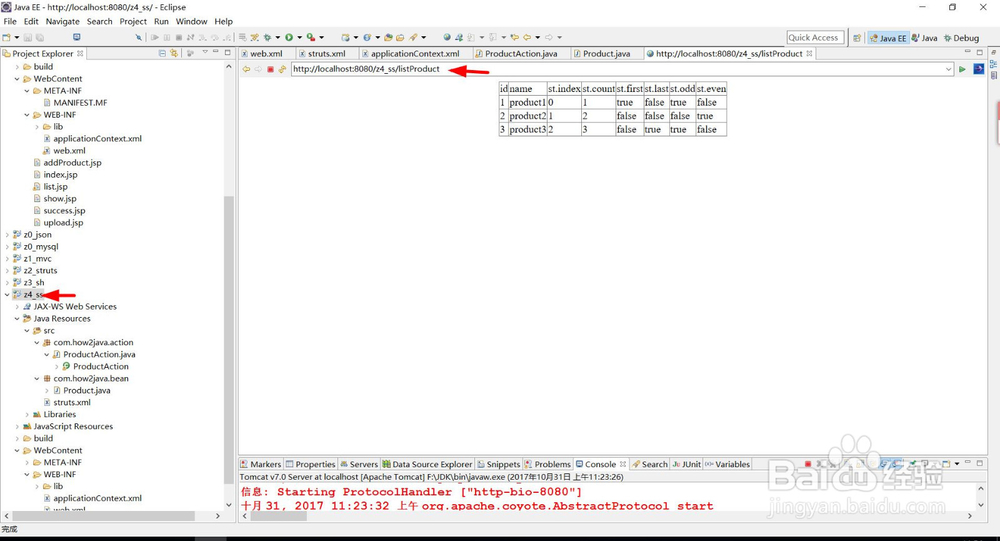
7、访问地址,执行结果。