使用Python3和Scrapy进行网站图片爬虫自动下载
1、在Ubuntu系统上安装python3
hxb@lion:~$ sudo apt-get install python3

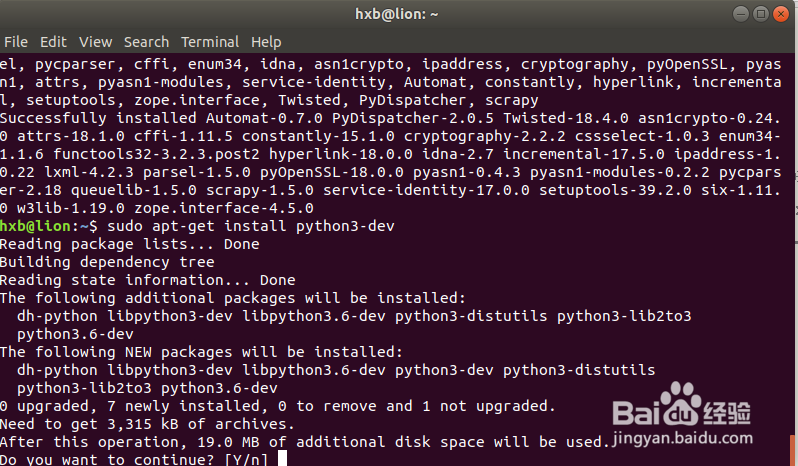
2、安装python3-dev依赖包
hxb@lion:~$ sudo apt-get install python3-dev
3、安装pip包,用于安装scrapy需要依赖的相关python库
hxb@lion:~$ sudo apt install python-pip
Query the Pip version:
hxb@lion:~$ pip -Vpip 9.0.1 from /usr/lib/python2.7/dist-packages (python 2.7)
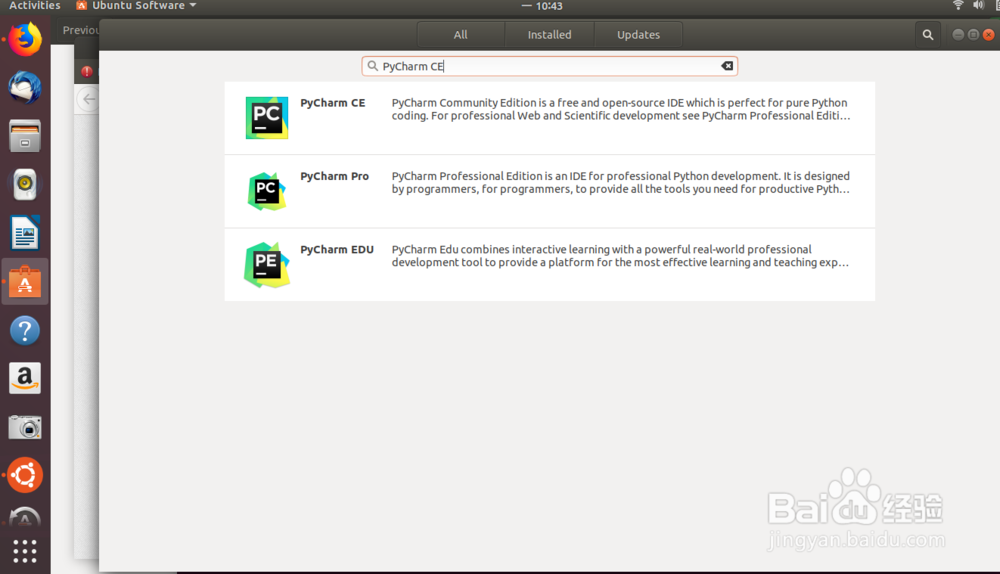
4、安装Ubuntu系统上python的开发工具PyCharm CE
通过软件中心管理界面直接安装
1、Ubuntu 18默认提供了Pyton2.7版本,我们安装了Python3后系统中就存在多个python版本,会给接下来的安装依赖库带来一定的困扰,所以我们需要将环境切换到python3中
配置python2:
run the commands:sudo update-alternatives --install /usr/bin/python python /usr/bin/python2 100
hxb@lion:~/PycharmProjects$ sudo update-alternatives --install /usr/bin/python python /usr/bin/python2 100[sudo] password for hxb: update-alternatives: using /usr/bin/python2 to provide /usr/bin/python (python) in auto modehxb@lion:~/PycharmProjects$
2、配置python3:
hxb@lion:~$ sudo update-alternatives --install /usr/bin/python python /usr/bin/python3 150update-alternatives: using /usr/bin/python3 to provide /usr/bin/python (python) in auto modehxb@lion:~$
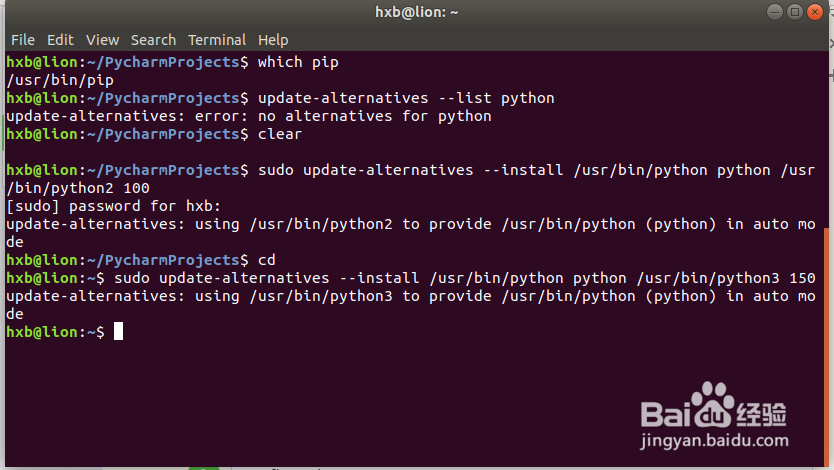
3、通过以下这里可以灵活实现python2和python3环境的灵活切换
sudo update-alternatives --config python
hxb@lion:~$ sudo update-alternatives --config pythonThere are 2 choices for the alternative python (providing /usr/bin/python). Selection Path Priority Status------------------------------------------------------------ 0 /usr/bin/python3 150 auto mode* 1 /usr/bin/python2 100 manual mode 2 /usr/bin/python3 150 manual modePress <enter> to keep the current choice[*], or type selection number: 2update-alternatives: using /usr/bin/python3 to provide /usr/bin/python (python) in manual modehxb@lion:~$ python -VPython 3.6.5

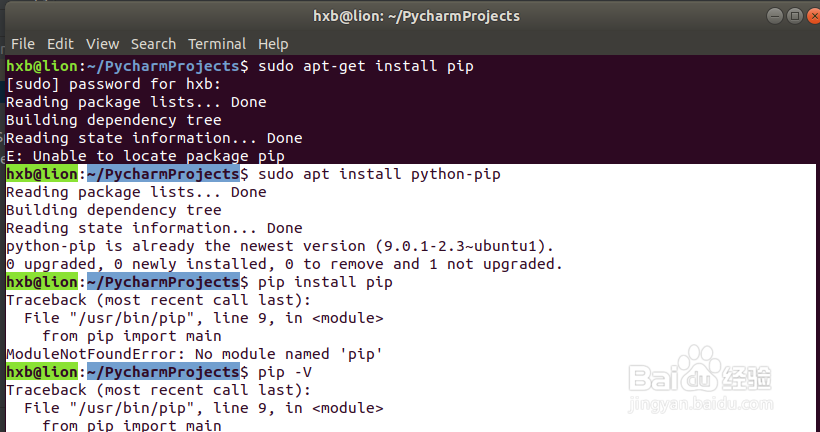
4、在安装pip过程中可能出现以下错误,在将环境切换到python3后需要从新安装python-pip包
hxb@lion:~/PycharmProjects$ sudo apt install python-pip
Reading package lists... DoneBuilding dependency tree Reading state information... Donepython-pip is already the newest version (9.0.1-2.3~ubuntu1).0 upgraded, 0 newly installed, 0 to remove and 1 not upgraded.hxb@lion:~/PycharmProjects$ pip install pipTraceback (most recent call last): File "/usr/bin/pip", line 9, in <module> from pip import mainModuleNotFoundError: No module named 'pip'hxb@lion:~/PycharmProjects$ pip -VTraceback (most recent call last): File "/usr/bin/pip", line 9, in <module> from pip import mainModuleNotFoundError: No module named 'pip'
Resolve the problem:
1. remove pip:
hxb@lion:~/PycharmProjects$ sudo apt-get remove python-pip
2. install pip again:
hxb@lion:~/PycharmProjects$ sudo apt-get install python-pip
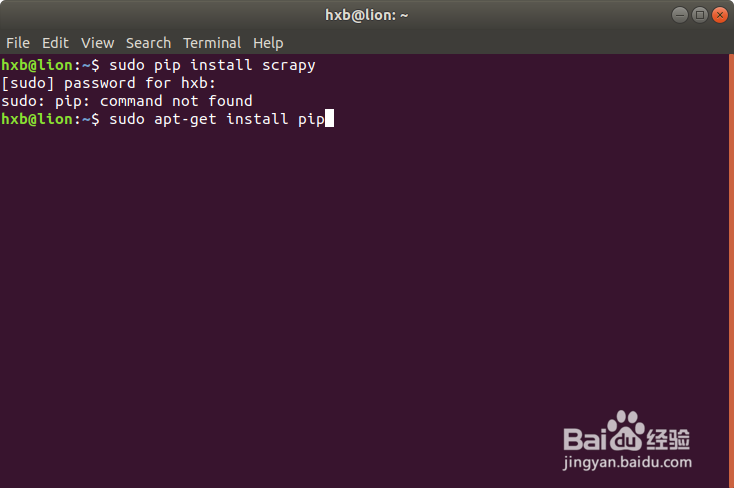
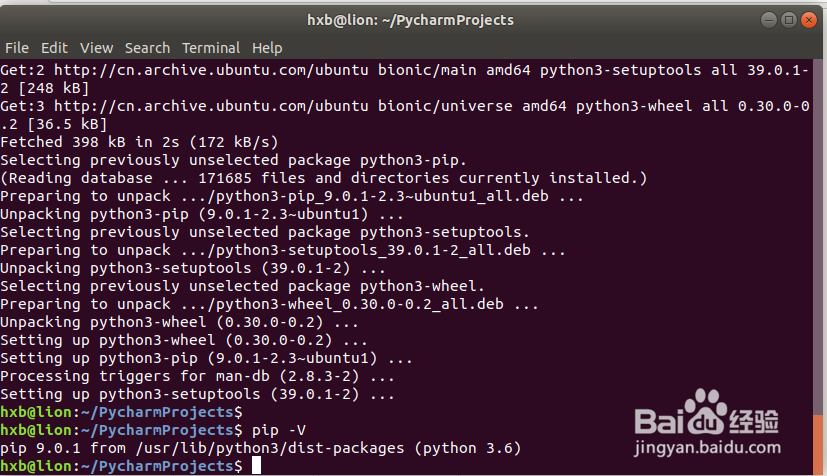
5、安装pip for python3
hxb@lion:~/PycharmProjects$ sudo apt-get install python3-pip
Reading package lists... DoneBuilding dependency tree Reading state information... DoneThe following additional packages will be installed: python3-setuptools python3-wheelSuggested packages: python-setuptools-docThe following NEW packages will be installed: python3-pip python3-setuptools python3-wheel0 upgraded, 3 newly installed, 0 to remove and 1 not upgraded.Need to get 398 kB of archives.After this operation, 2,073 kB of additional disk space will be used.Do you want to continue? [Y/n] yGet:1 http://cn.archive.ubuntu.com/ubuntu bionic-updates/universe amd64 python3-pip all 9.0.1-2.3~ubuntu1 [114 kB]Get:2 http://cn.archive.ubuntu.com/ubuntu bionic/main amd64 python3-setuptools all 39.0.1-2 [248 kB]Get:3 http://cn.archive.ubuntu.com/ubuntu bionic/universe amd64 python3-wheel all 0.30.0-0.2 [36.5 kB]Fetched 398 kB in 2s (172 kB/s) Selecting previously unselected package python3-pip.(Reading database ... 171685 files and directories currently installed.)Preparing to unpack .../python3-pip_9.0.1-2.3~ubuntu1_all.deb ...Unpacking python3-pip (9.0.1-2.3~ubuntu1) ...Selecting previously unselected package python3-setuptools.Preparing to unpack .../python3-setuptools_39.0.1-2_all.deb ...Unpacking python3-setuptools (39.0.1-2) ...Selecting previously unselected package python3-wheel.Preparing to unpack .../python3-wheel_0.30.0-0.2_all.deb ...Unpacking python3-wheel (0.30.0-0.2) ...Setting up python3-wheel (0.30.0-0.2) ...Setting up python3-pip (9.0.1-2.3~ubuntu1) ...Processing triggers for man-db (2.8.3-2) ...Setting up python3-setuptools (39.0.1-2) ...
6、检查python3环境下pip安装是否正常
hxb@lion:~/PycharmProjects$ pip -V
pip 9.0.1 from /usr/lib/python3/dist-packages (python 3.6)hxb@lion:~/PycharmProjects$
7、安装scrapy on Python3
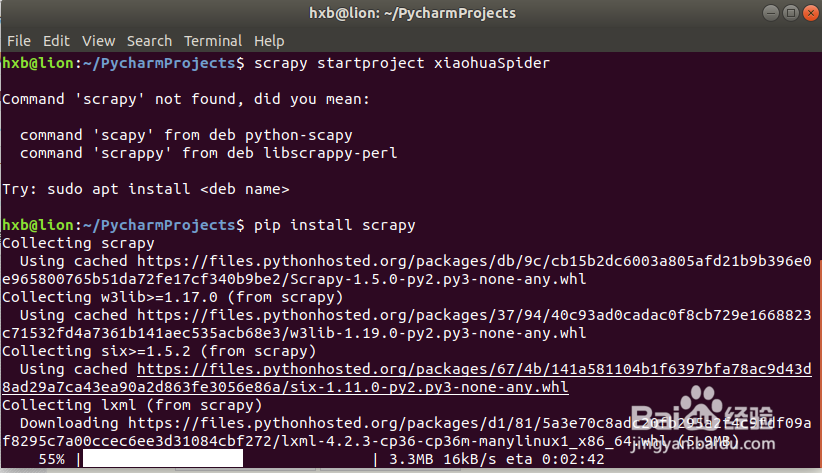
hxb@lion:~/PycharmProjects$ pip install scrapy
import scrapy in the Python3 env:
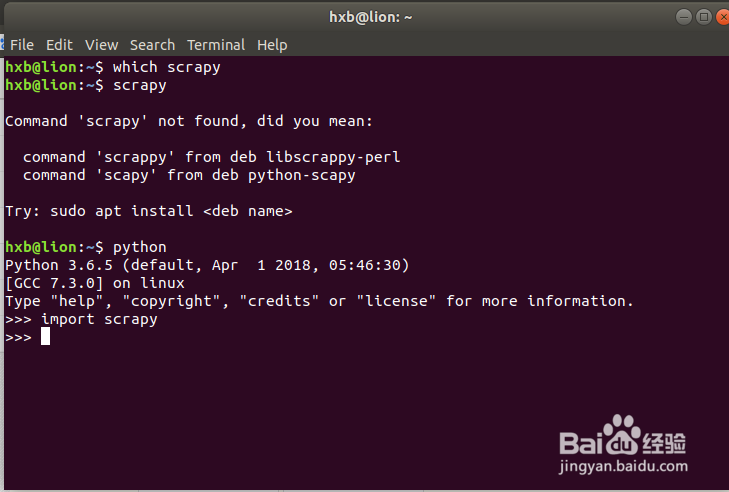
hxb@lion:~$ pythonPython 3.6.5 (default, Apr 1 2018, 05:46:30) [GCC 7.3.0] on linuxType "help", "copyright", "credits" or "license" for more information
.>>> import scrapy
>>>
8、安装scrapy过程中出现如下错误:
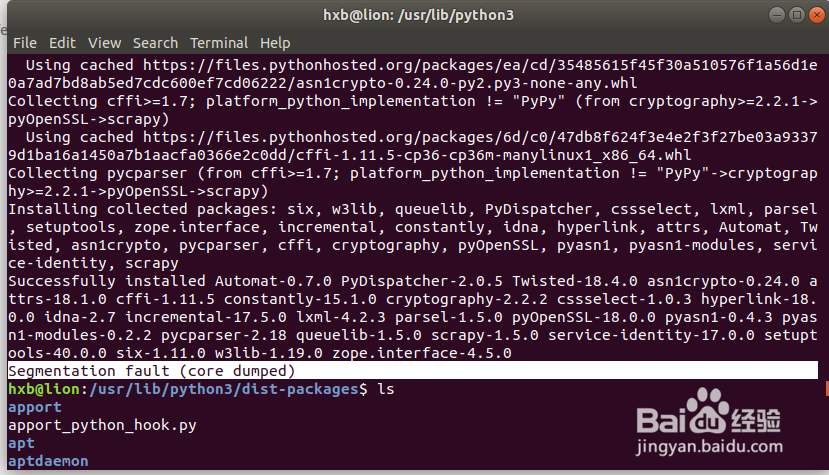
Segmentation fault (core dumped) when install scrapy
9、在安装scrapy前增加sudo权限可以解决步骤8的错误:
sudo -H pip install scrapy
hxb@lion:~/PycharmProjects$ scrapyCommand 'scrapy' not found, did you mean: command 'scapy' from deb python-scapy command 'scrappy' from deb libscrappy-perlTry: sudo apt install <deb name>
you should install scrapy with sudo
hxb@lion:~$ sudo -H pip install scrapy
Successfully installed Automat-0.7.0 PyDispatcher-2.0.5 Twisted-18.4.0 attrs-18.1.0 cffi-1.11.5 constantly-15.1.0 cryptography-2.2.2 cssselect-1.0.3 hyperlink-18.0.0 incremental-17.5.0 lxml-4.2.3 parsel-1.5.0 pyOpenSSL-18.0.0 pyasn1-0.4.3 pyasn1-modules-0.2.2 pycparser-2.18 queuelib-1.5.0 scrapy-1.5.0 service-identity-17.0.0 w3lib-1.19.0 zope.interface-4.5.0hxb@lion:~$


10、安装virtualenv based on pip
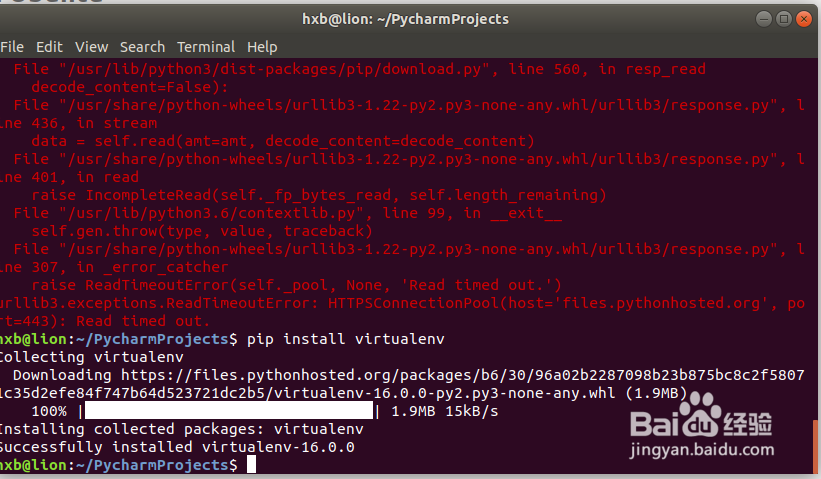
hxb@lion:~/PycharmProjects$ pip install virtualenv
11、安装scrapy依赖的其他python库:
hxb@lion:~/PycharmProjects$ sudo apt-get install python-dev python-pip libxml2-dev libxslt1-dev zlib1g-dev libffi-dev libssl-dev
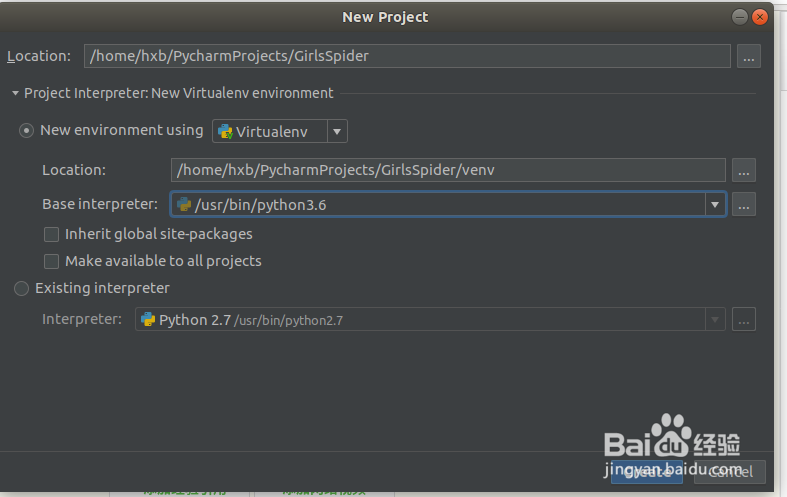
1、在PyCharm CM开发工具中创建一个Python3的工程
New Python Project "GirlsSpider" with python3

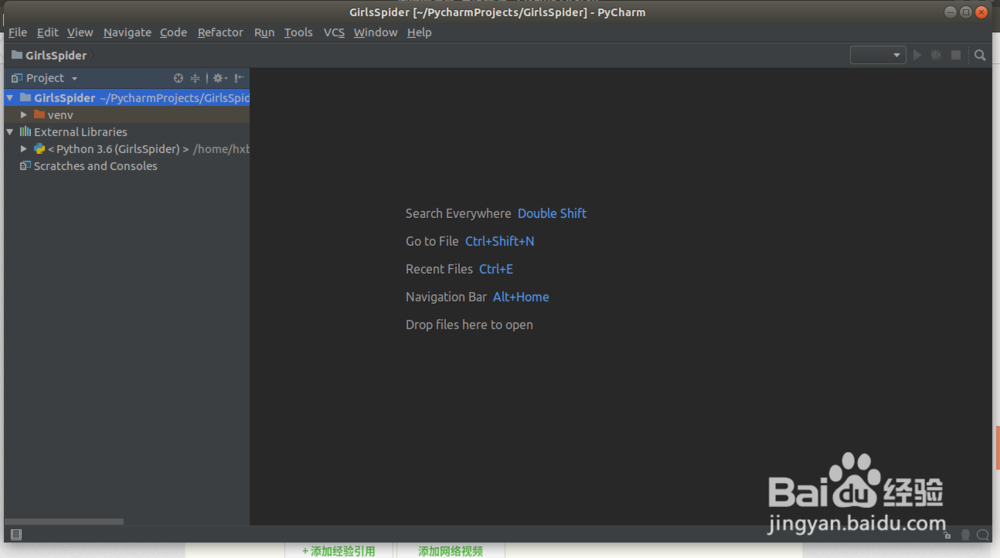
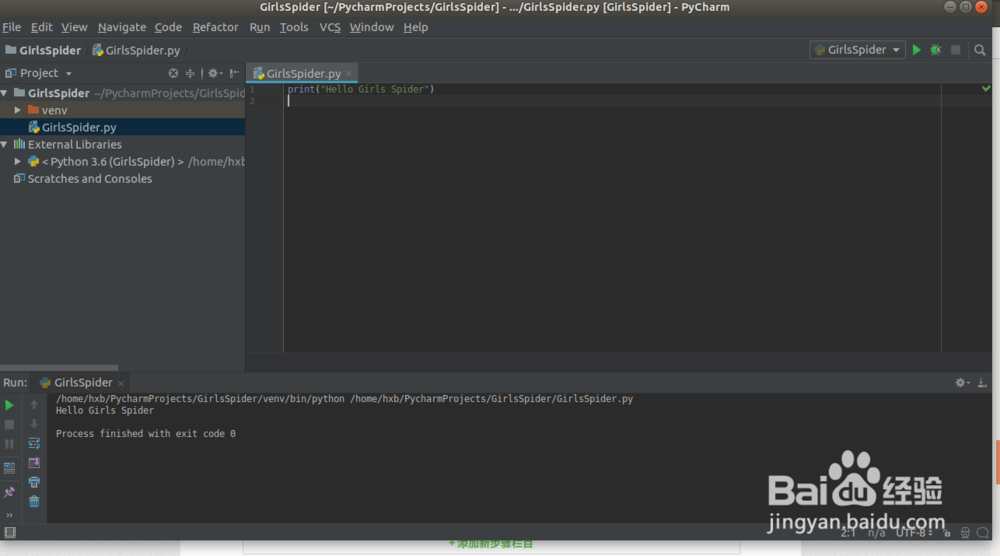
2、增加一个python文件输入一下语句进行测试:
GirlsSpider.py
print("Hello Girls Spider")
运行GirlsSpider.py文件可以看到正常的输出:
/home/hxb/PycharmProjects/GirlsSpider/venv/bin/python /home/hxb/PycharmProjects/GirlsSpider/GirlsSpider.pyHello Girls Spider
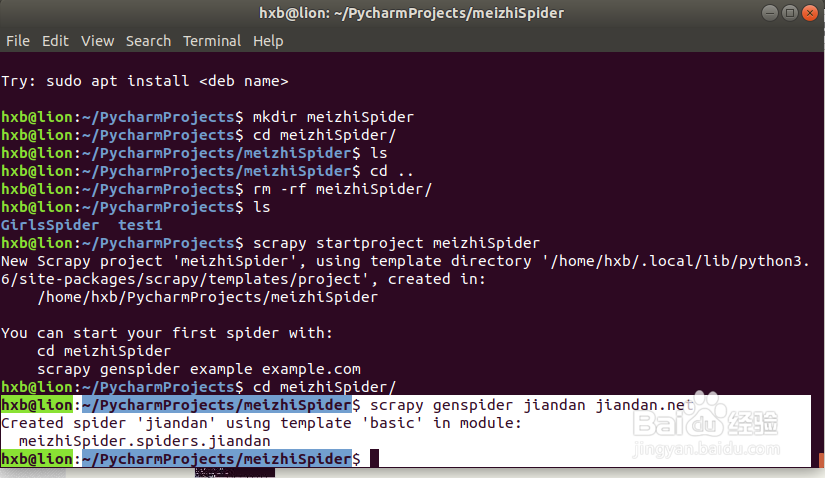
1、使用Scrapy指令创建爬虫项目框架:
hxb@lion:~/PycharmProjects$ scrapy startproject meizhiSpiderNew
Scrapy project 'meizhiSpider', using template directory '/home/hxb/.local/lib/python3.6/site-packages/scrapy/templates/project', created in: /home/hxb/PycharmProjects/meizhiSpiderYou can start your first spider with: cd meizhiSpider scrapy genspider example example.comhxb@lion:~/PycharmProjects$

2、使用scrapy genspider生存一个spider文件,同时需要看项目的python环境是否为python3如果不是需要切换python环境
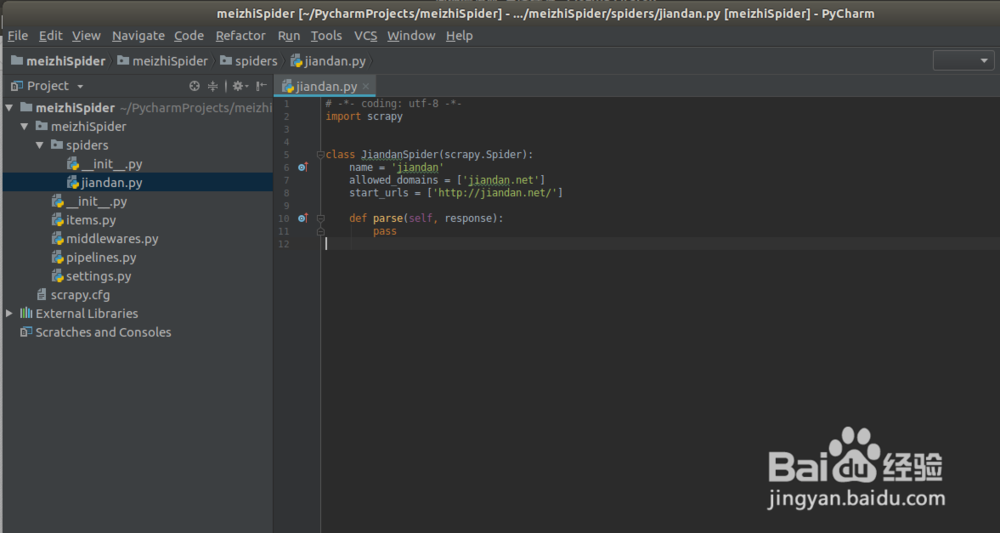
hxb@lion:~/PycharmProjects/meizhiSpider$ scrapy genspider jiandan jiandan.net
Created spider 'jiandan' using template 'basic' in module: meizhiSpider.spiders.jiandanhxb@lion:~/PycharmProjects/meizhiSpider$
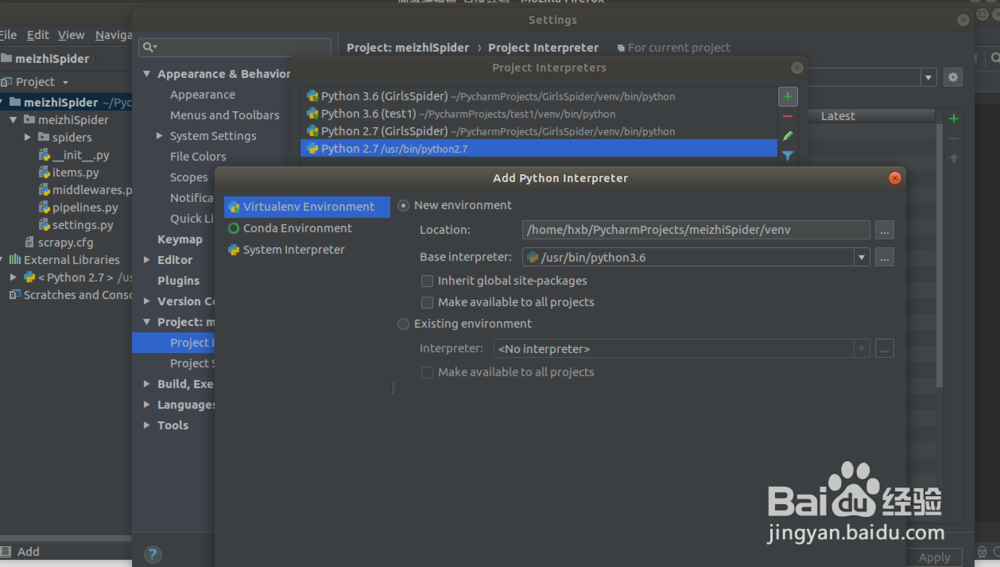
you can find the python version is 2.7 ,we need change the project python2.7 to python3.6 in the PyCharm
1) File ->Settings->Project:meizhiSpider->Project Interpreter
2) Add new Python Interpreter env
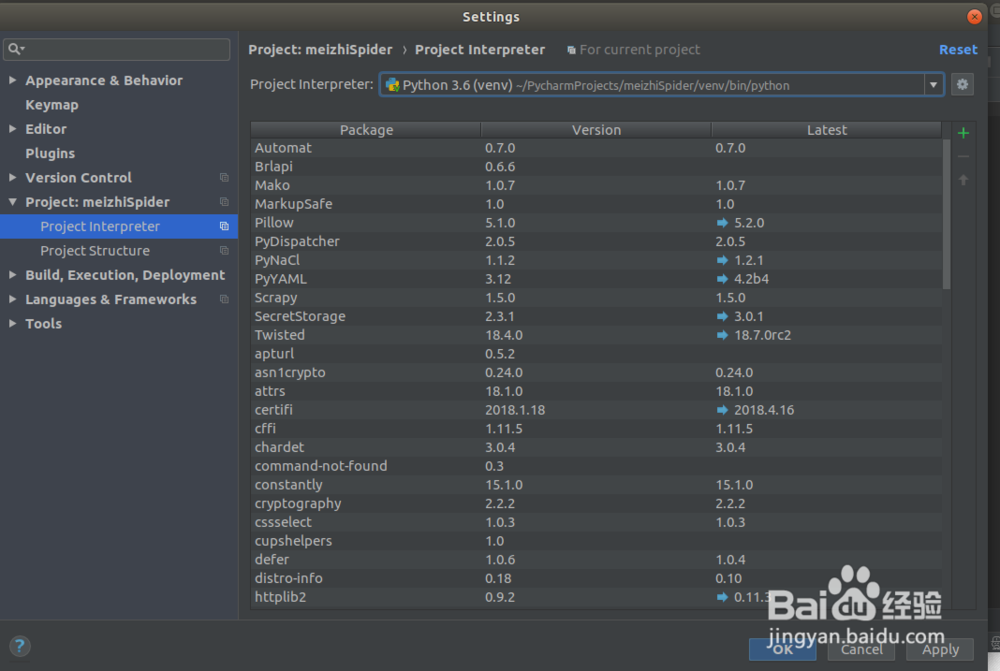
3)run the jiandan.py to check wether the scrapy env is ok


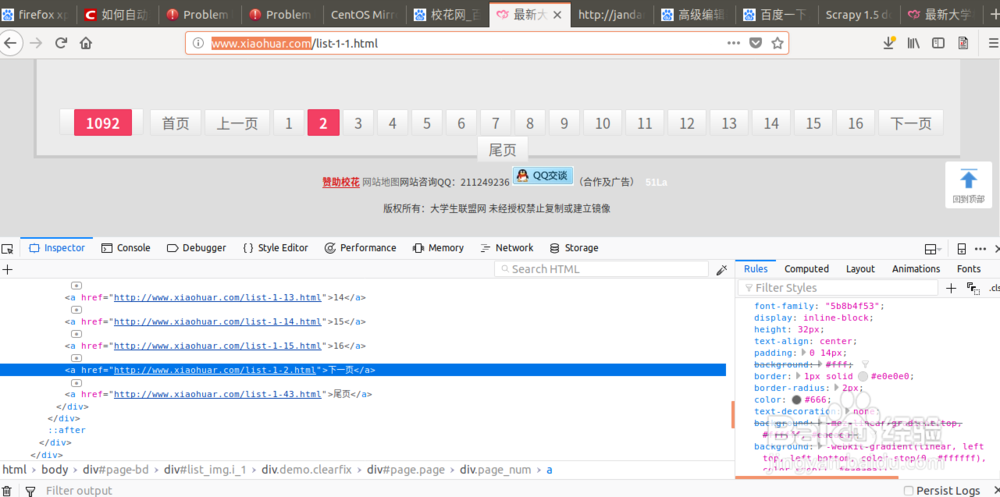
1、在进行jiandan网站的测试时发现存在rebots包含导致无法进行图片下载,于是选择xiaohuar网进行图片爬虫下载
1. 目标website: xiaohuar.com/hua/
2. 图片的xpath: '//div[@class="img"]/a/img/@src'
3.下一页的xpath: '//a[text()="下一页"]/@href'
2、安装一下顺序编写代码:
1. jiandan.py:spider code in jiandan.py refer to the following picture
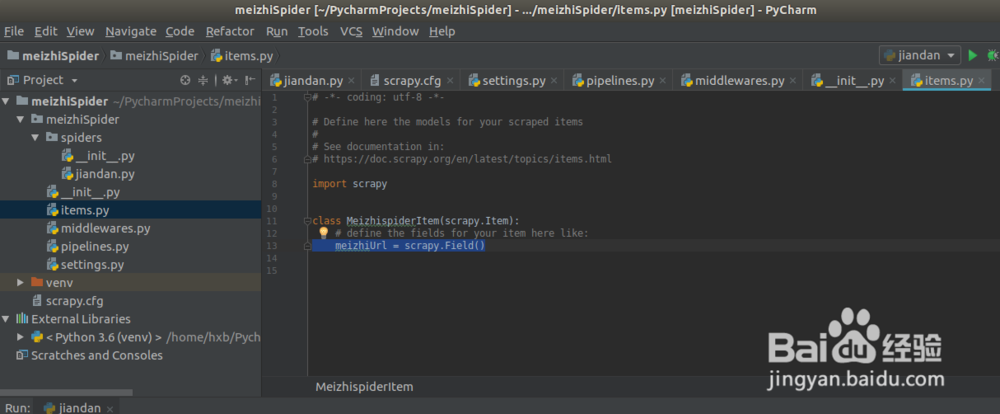
2. item.py:define the items for the scrapy result
3. pipelines.py: save the scrapy result
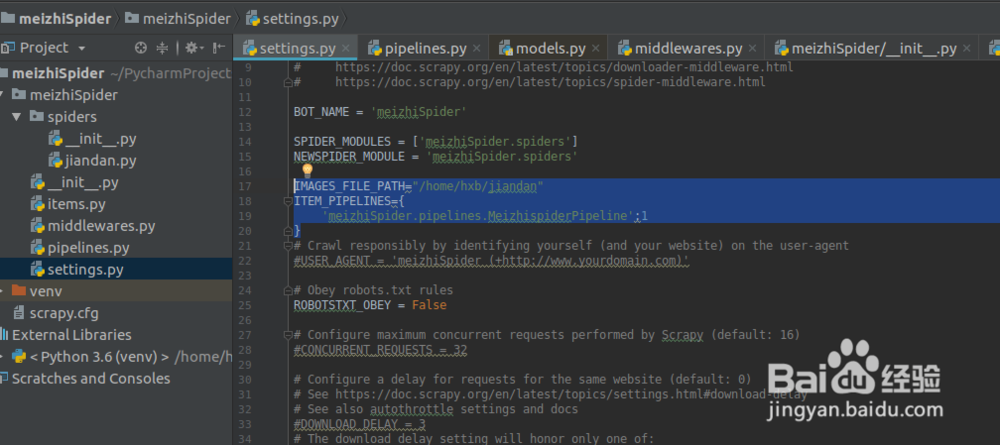
4. settings.py: settings for scrapy


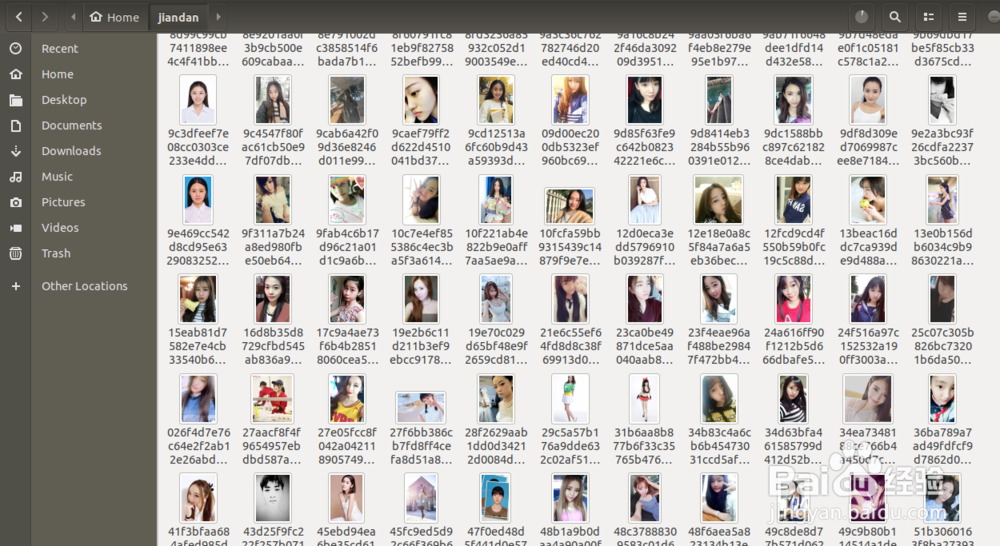
3、运行爬虫,可以看到我们的爬虫正在工作,不断下载图片到本地
1. run the scrapy:
hxb@lion:~/PycharmProjects/meizhiSpider/meizhiSpider$ scrapy crawl jiandan1. image files were saved in the directory: /home/hxb/jiandan